In this project, you will experiment with interest points, image projection and videos. You will manipulate videos by applying several transformations frame by frame. In doing so, you will explore correspondence using interest points, robust matching with RANSAC, and homography. You will also apply these techniques to videos by projecting and manipulating individual frames. You can also investigate cylindrical and spherical projection and other extensions of photo stitching and homography as bells and whistles.
In this project you can earn up to 230 points. We give you a starter kit that include most of the necessary files to start the project including VLfeat. Vlfeat is a library with various functions to extract and work with SIFT features. In this project -- unlike other projects -- you can use any standard MATLAB function or any function in Vlfeat.
In this project we provide a starter package that includes a video, individual frames in jpg format, VLfeat library and some code to start. You can download the starter code here.
VLfeat is a SIFT feature extraction/matching package. Before you start you need to run
try_correspondence. This function reads two images and generates and visualizes
SIFT features. You can also use this function for your reference.
We provide a function named auto_homography.m that inputs two images, extracts
sift features, runs RANSAC and computes a homography between the two images. We
provide this to let you focus on high level applications.
From matlab repository you will extensively use maketform.m and imtransform.m. maketform.m inputs a 3x3 projection matrix (that auto_homography computes for you) and generates a MATLAB transformation object. imtransform.m applies this transformation on an image that you provide. You will also need to use XData and Ydata arguments to define the span of the output image that imtransform.m creates. Read MATLAB instructions to use maketform.m and imtransform.m.
We give you a sequence of frames in jpg format so you don't need to worry about
reading the video before you start. However, to produce video outputs for your
report you need a software to convert your frames to a video.
MATLAB can read/write videos using VideoReader and VideoWriter but it often provides a limited support. To produce video output you can use any available software. We suggest installing and using ffmpeg on your computer. ffmpeg is a strong command line library that can convert almost any video format to any video format.
You can download ffmpeg for any
OS here:
https://www.ffmpeg.org/download.html. Using
ffmpeg you can convert a set of jpg images to a video with the following
command in Unix/Mac/Windows shell:
ffmpeg -r 30 -i aligned_frames/a%04d.jpg -pix_fmt yuv420p out.mp4
To convert a movie to a set of frames use:
ffmpeg -ss 00:00:00 -t
00:00:30 -i video.mp4 -r 30 frames/f%4d.jpg
The argument -ss determines the starting point, -t determines the end point and -r determines the frame rate. After you produce your video outputs, upload them to Youtube and embed them in your report. Make sure to set up a video converter at least a week before the deadline.
This is a video from 10 years ago in Jaipur, Northern India. We use the first
30 seconds that has 900 frames. Both the video and the decomposed jpg frames
are included in the starter
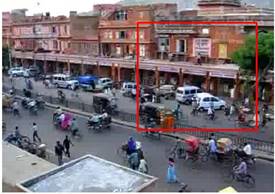
kit. We use frame number 450 as the reference frame. That means we map all
other frames onto the “plane” of this frame. This involves: (1) compute
homography H between two frames; (2) project each frame onto the same surface;
(3) blend the surfaces. Check that your homography
is correct by plotting four points that form a square in frame 270 and their
projections in each image, like this:
Include
those images in your project page. Note
that because of differences in convention, you need to transpose the homography
when you call maketform:
T = maketform(‘projective’, H’);
Also, you need to specify the output coordinates with respect to the reference image
so that you can map all images onto the same surface. I suggest x=[-650…980] and y=[-50…460]:
imt = imtransform(im, T, 'XData',[-651 980],'YData',[-51 460]);
You will need to write a blending function. You can use a simple method of replacing zero pixels in your output
surface with non-zero pixels from each image.
Better blending methods are bells and whistles.
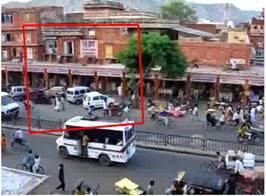
In this part you will map the frame number
270 on the reference image and produce an output like the following.
The images and videos in this project page are down-sampled but you need to produce a full resolution version.
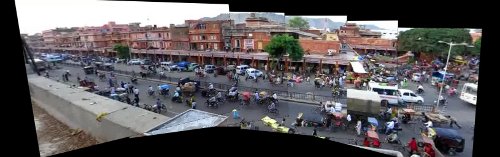
In this
part you will produce a panorama using five key frames. Let's determine frames
[90, 270, 450, 630, 810] as key frames. The goal is to map all the five frames
onto the plane corresponding to frame 450 (that we also call the reference
frame). For the frames 270 and 630 you can follow the instructions in part 1.
Mapping frame 90 to frame 450 is difficult because they share very little area.
Therefore you need to perform a two stage mapping by using frame 270 as a
guide. Compute one projection from 90 to 270 and one from 270 to 450 and
multiply the two matrices. This produces a projection from 90 to 450 even
though these frames have very little area in common.
For this stage, include your output panorama in your report.
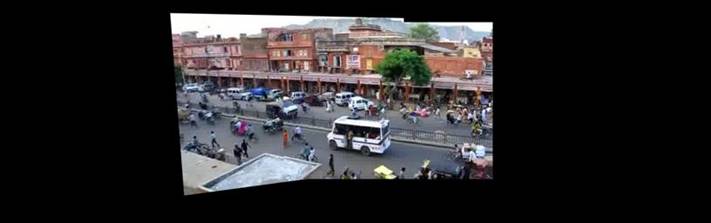
In this part you will produce a video sequence by projecting all frames onto the plane corresponding to the reference frame (No. 450). For those frames that have small or no overlap with the reference frame you need to first map them onto the closest key frame. You can produce a direct homography between each frame and the reference frame by multiplying the two projection matrices. For this part output a video like the following:
To convert your individual frames to a video first save your frames in a separate folder and use ffmpeg or some other video converter to produce an output movie. Your frames could be named a0001.jpg to a0900.jpg. You can generate these names by using imwrite(im,sprintf('aligned_frames/a%04d.jpg',i));
Use ffmpeg -r 30 -i aligned_frames/a%04d.jpg -pix_fmt yuv420p aligned_frames.mp4 in ommand prompt to convert your frames to a movie. Upload your movie to youtube or a smiliar video hosting website and embed that in your report.
Tips
In this part you will remove moving objects from the video and create a background panorama that should incorporate pixels from all the frames.
In the video you produced in part 3 each pixel appears in several frames. You need to estimate which of the many colors correspond to the background. We take advantage of the fact that the background color is fixed while the foreground color changes frequently (because foreground moves). For example, a pixel on the street has a gray color. It can become red, green, white or black each for a short period of time. However, it appears gray more than any other color.
For each pixel in the sequence of part 3, determine all valid colors (colors that come from all frames that overlap that pixel). You can experiment with different methods for determining the background color of each pixel, as discussed in class. Perform the same procedure for all pixels and generate output. The output should be a completed panorama showing only pixels of background or non-moving objects.
Map the background panorama to the movie coordinates. For each frame of the movie, say frame 1, you need to estimate a projection from the panorama to frame 1. Note, you should be able to re-use the homographies that you estimated in Part 3. Perform this for all frames and generate a movie that looks like the input movie but shows only background pixels. All moving objects that belong to the foreground must be removed.
In the background video, moving objects are removed. In each frame, those pixels that are different enough than the background color are considered foreground. For each frame determine foreground pixels and generate a movie that only includes foreground pixels.
Add an unexpected object in the movie. Label the pixels in each frame as foreground or background. An inserted object must go below foreground and above background. Also note that an inserted object must appear fixed on the ground. Create a video that looks like original video with the tiny difference that some objects are inserted in the video.
You can
apply the seven parts of the main project on two other videos. You get 20
points for processing one additional video and 40 points for processing two. If
you do two additional videos, one of them must be your own. You get full points
if you complete the first six parts of the main project.
Note that the camera position should not move in space but it can
rotate. You also need to have some moving objects in the camera. Try to use
your creativity to deliver something cool.
In part 2, you performed image tiling. In order to generate a good looking panorama you need to select a seam line to cut through for each pair of individual images. Because the objects move the cut must be smart enough to avoid cutting through objects. You can also use Laplacian blending. You are free to use the code from your previous projects.
In Part 5 you created a background movie by projecting back the panorama
background to each frame plane. If you map a wider area you will get a wider
background movie. You can use this background movie to extend the borders of
your video and make it wider. The extended video must be at least 50% wider.
You can keep the same height.
You can track camera orientation using the homography matrices for each frame. This allows you to estimate and remove camera shake. Please note that camera shake removal for moving cameras is a more difficult problem and is an active area of research in computational photography. One idea (which we haven't tried and might not work) is to assume that camera parameters change smoothly and obtain a temporally smoothed estimate for each camera parameter. A better but more complicated method would be to solve for camera angle and focal length and smooth estimates for those parameters.
You can use the techniques in part 6 to add more people to the street. You can sample people from other frames that are a few seconds apart. You can alternatively show two copies of yourself in a video. Please note that your camera needs some rotation.
To turn in your assignment, place your index.html file and any supporting media in your project directory: http://web.engr.illinois.edu/~netid/cs498dwh/proj5/, where "netid" is your netid (e.g., dhoiem). Also, e-mail me the zipped code in "netid_proj5.zip" and include a link to the project page in the text. See project instructions for details. In the e-mail, tell me how many points you think you should get for the core project and any bells and whistles.
Use words, images, and videos to show us what you've done.
The core assignment is worth 100 points. You can also earn up to 130 extra points for the bells & whistles mentioned above.