Welcome to CS 225!
Welcome to CS 225: Data Structures! In CS 225, you will be using C++ and the Linux operating system to aid your journey in becoming a master of data structures!
Setting Up For CS 225
Before you can begin working on assignments, you will need to set up EWS and optionally your own computer to begin development work. Afterwards, you will need to set up your git repository, your code base you will use to receive mps and labs/submit them for grading.
Setup your EWS machine…
The first time you use an EWS machine, you will need to configure clang by running:
source /class/cs225/setup
This command only needs to be run once; you don’t have to run it each time you log back in.
or setup your computer locally
Setup Your Git Repository
Getting Started
You’ll be using the command line for much of C++. If you’re not comfortable with the command line yet, check out this guide on the command line.
You’ll want to find a text editor you like. Here are some suggestions
Three standard editors that work within a command line interface:
nano, simple and user-friendly for quick editsvim, powerful but very un-friendly to beginnersemacs, powerful but also un-friendly to beginners
Beginner friendly’s with graphical UI’s:
atom, open-source editor developed by githubbrackets, open-source editor developed by adobegedit, simple, open-source editor default to most Linux distributionsvisual studio code, free light-weight editor developed by Microsoft
Lab Insight
This lab is the starting point in your CS 225 class journey. It will touch some of the starting base concepts that will guide you through the class and be your aid in learning about data structures. Hope you have fun throughout the course.
Accessing your course repository
Once you have set up your repository, you will also need to merge in this particular assignment:
$ git fetch release
$ git merge release/lab_intro -m "Merging lab_intro"
If git happens to complain about unrelated histories, use this command:
$ git fetch release
$ git merge release/lab_intro --allow-unrelated-histories
Setting up CS 225 on EWS
If you are using an EWS machine (any lab machine or are SSH’ing into an EWS machine), make sure to run this command to set up your compiler for CS 225:
$ source /class/cs225/setup
Updating your partners.txt file
For your lab assignments (not MPs), you may work with a partner!
If you want to work with a partner, pair up with someone in your lab section
and both of you must update the partners.txt file inside of lab_intro.
In this file, include each of your netids as one netid per line. For example:
hello2
world3
Understanding the HSL Color Space
In CS 225, we will not be working with the physical properties of color that you may be familiar with from other sources (the “RGB color space” for red-green-blue channels.) Instead, we will be using an alternative color space that represents colors by human perception of color.
The HSL color space uses the Hue, Saturation, and Luminance of the color. From the Adobe Technical Guides page on “The HSB/HLS Color Model”, Adobe explores these terms:
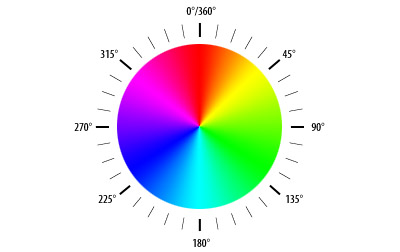
Hue (denoted as h) defines the color itself, for example, red in distinction to blue or yellow. The values for the hue axis run from 0–360° beginning and ending with red and running through green, blue and all intermediary colors like greenish-blue, orange, purple, etc.
There are two hues that we’ll use later in this lab:
- “Illini Orange” has a hue of 11
- “Illini Blue” has a hue of 216

Saturation (denoted as s) indicates the degree to which the hue differs from a neutral gray. The values run from 0%, which is no color saturation, to 100%, which is the fullest saturation of a given hue at a given percentage of illumination.

Luminance (denoted as l) indicates the level of illumination. The values run as percentages; 0% appears black (no light) while 100% is full illumination, which washes out the color (it appears white).
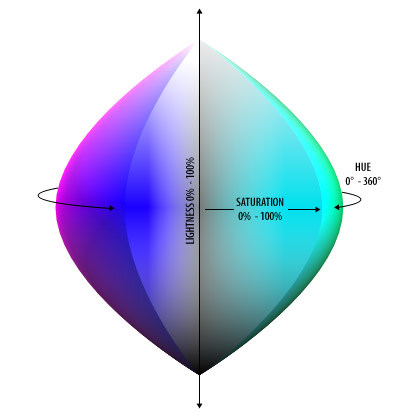
The full HSL color space is a three-dimensional space, but it is not a cube (nor exactly cylindrical). The area truncates towards the two ends of the luminance axis and is widest in the middle range. The ellipsoid reveals several properties of the HSL color space:
- At
l=0orl=1(the top and bottom points of the ellipsoid), the 3D space is a single point (the color black and the color white). Hue and saturation values don’t change the color. - At
s=0(the vertical core of the ellipsoid), the 3D space is a line (the grayscale colors, defined only by the luminance). The values of the hue do not change the color. - At
s=1(the outer shell of the ellipsoid), colors are vivid and dramatic!
Writing your first class: HSLAPixel
Motivation
The very first data structure you will write in CS 225 will be a class to maintain a single HSL pixel. We will use this class a lot throughout CS 225, so let’s use an API that is simple.
We’ll refer to this class as an HSLAPixel and place it inside of the cs225 namespace, an organization of data structures that we’ll use commonly within CS 225. Following convention, the definition must be placed in a file called cs225/HSLAPixel.h, and the member function implementations must be placed in a file called cs225/HSLAPixel.cpp.
Specification
Create a class HSLAPixel that contains four public member variables:
- Let
hdenote the hue of the pixel, storing the value of the hue in degrees as adoublefrom [0, 360). - Let
sdenote the saturation of the pixel, storing the value as adoublefrom [0, 1]. - Let
ldenote the luminance of the pixel, storing the value as adoublefrom [0, 1]. - Let
adenote the alpha channel, how transparent the pixel is, storing the value as adoublefrom [0, 1].
Additionally, you will need to complete three constructors defined in the Doxygen:
Compile and Testing
A Makefile has been provided for you for this lab (you’ll make your own soon!). To compile your program, run:
$ make
If make fails, you will see error messages. We use clang, which aims to provides descriptive error messages that try to help you not only spot the error but also will provide a suggestion on how to fix the bug.
If make runs successfully, you will see three warning messages:
lab_intro.cpp:57:36: warning: unused parameter 'centerX' [-Wunused-parameter]
PNG createSpotlight(PNG image, int centerX, int centerY) {
                                   ^
lab_intro.cpp:57:49: warning: unused parameter 'centerY' [-Wunused-parameter]
PNG createSpotlight(PNG image, int centerX, int centerY) {
                                                ^
lab_intro.cpp:91:35: warning: unused parameter 'secondImage'
[-Wunused-parameter]
PNG watermark(PNG firstImage, PNG secondImage) {
                                  ^
This is expected – you have not written these functions yet.
If you get a bunch of “undefined reference” errors like this one:
/usr/include/c++/v1/ostream:773: undefined reference to `__cxa_begin_catch'
it probably means you did not run that source /class/cs225/setup command described above.
CS 225’s PNG Class
Inside of your cs225 directory, you may have noticed PNG.h and PNG.cpp. We have provided an already complete PNG class that saves and loads PNG files and exposes a simple API for you to modify PNG files.
In C++, the scope resolution operator, ::, denotes a function or variable is a member of a class. The API for the PNG class includes:
- Loading/Saving PNG files:
bool PNG::readFromFile(const std::string & fileName), loads an image based on the provided file namebool PNG::writeToFile(const std::string & fileName), writes the current image to the provided file name (overwriting existing files)
- Retrieving image and pixel information:
unsigned int PNG::width() const, returns the width of the imageunsigned int PNG::height() const, returns the height of the imageHSLAPixel & getPixel(unsigned int x, unsigned int y), returns a pointer to a pixel at a provided location
- Methods to create empty PNGs, resizing an image, etc.
Open the doxygen for PNG
Example Usage
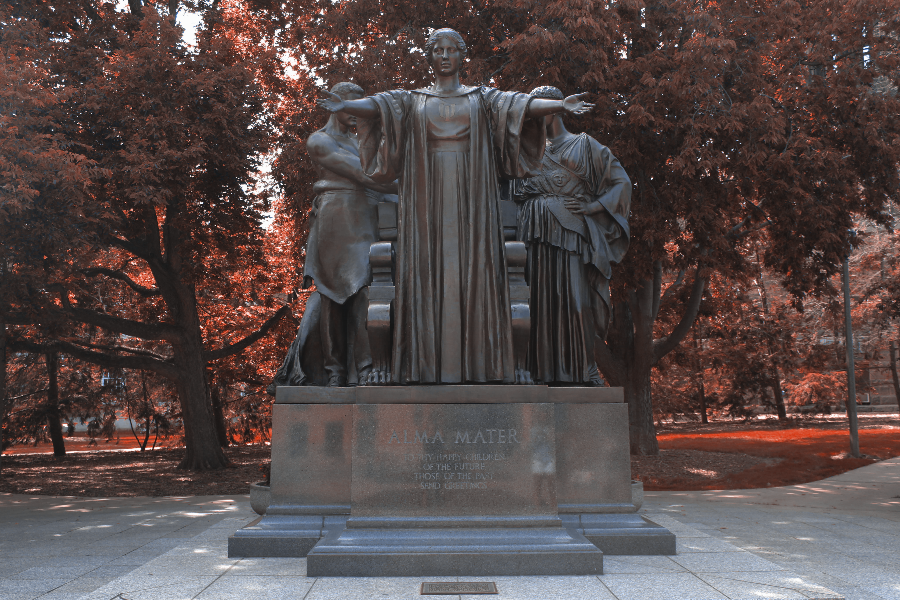
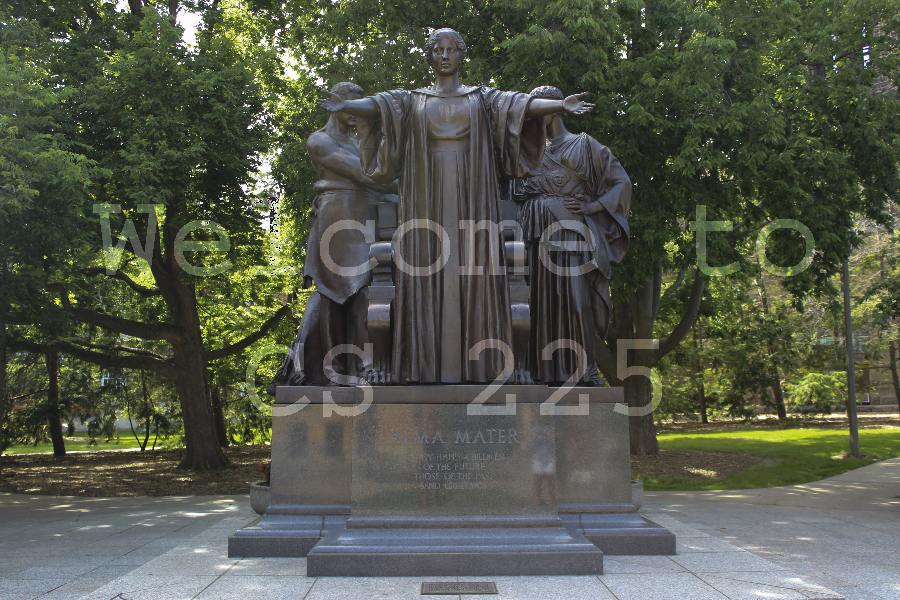
Suppose we want to transform an image to grayscale. Earlier you learned that a pixel with a saturation set to 0% will be a gray pixel. For example, here’s this transformation applied to the Alma Mater:
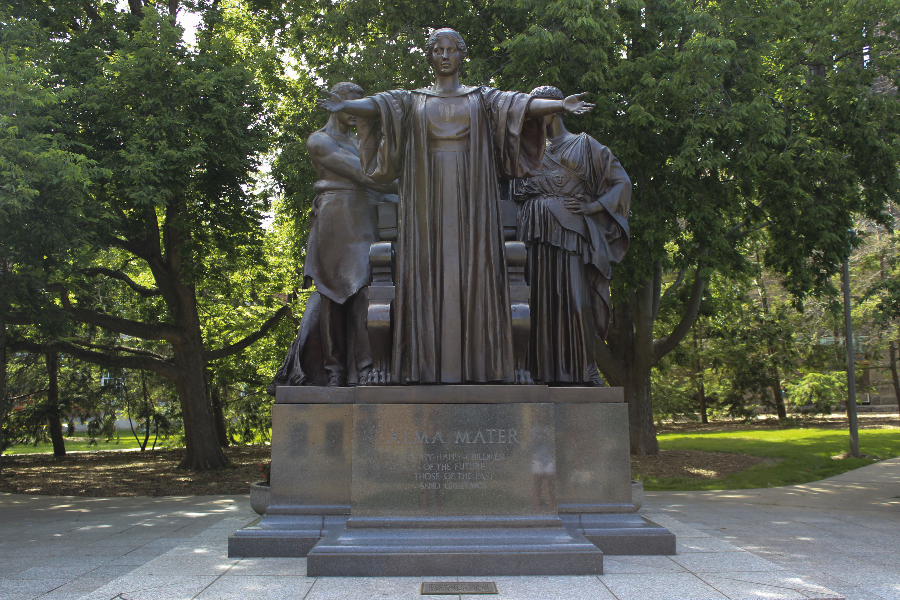 alma.png
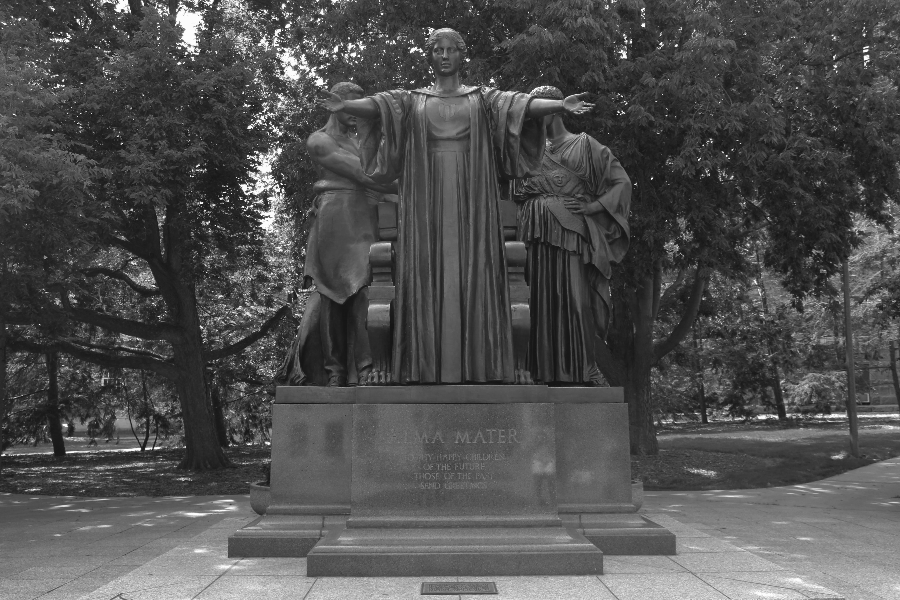 out-grayscale.png
The code that was used to create the above image follows:
// Function `grayscale` receives a PNG as input by reference
void grayscale(PNG & png) {
  // Loop through all of pixels of the PNG (width x height):
  for (unsigned int x = 0; x < png.width(); x++) {
    for (unsigned int y = 0; y < png.height(); y++) {

      // Get a reference to the pixel at (x, y):
      HSLAPixel & pixel = png.getPixel(x, y);

      // Set the pixel's saturation to 0:
      pixel.s = 0;

      // ...that's it!  Since `pixel` is a reference, the memory storing the pixel
      // is the memory inside of the PNG image.  No need to `set` the pixel.
    }
  }
}
Lab Assignment: Modify the PNG in three new ways!
To complete the lab, complete illinify, spotlight, and watermark functions in lab_intro.cpp. You will find a complete grayscale function (above) is already provided for you.
All C++ programs begin with the main function, which is usually defined in main.cpp. You can find that a main function has been provided for you that:
- Loads in the image
alma.png - Calls each image modification function
- Saves the modified image as
out-MODIFIED.png, whereMODIFIEDis the modification (eg:out-grayscale.png)
A description of each function is provided in lab_intro.cpp and examples are given below:
To illinify an image is to transform the hue of every pixel to Illini Orange or Illini Blue.
The hue of every pixel is set to the a hue value of either orange or blue, based on if the pixel’s hue value is closer to orange than blue. Remember, hue values are a circle!

To spotlight an image is to create a spotlight centered at a given point: (centerX, centerY).
A spotlight adjusts the luminance of a pixel based on the Euclidean distance the pixel is away from the center by decreasing the luminance by 0.5% per 1 pixel Euclidean distance away from the center, up to an 80% decrease in luminance.
For example, a pixel 3 pixels above and 4 pixels to the right of the center is a total of pixels away and its luminance is decreased by 2.5% (0.975x its original value). At a distance over 160 pixels away, the luminance will always be decreased by 80% (0.2x its original value).
To watermark an image is to lighten a region of an image based on the contents of a spotlight, given both images.
For every pixel that exists within the bounds of both image and spotlight, the luminance of image must be increased by +0.2 (absolute, but not to exceed 1.0) if and only if the luminance of spotlight at the same pixel is 100%.
You should not assume anything about the size of the images. However, you need only consider the range of pixels that exist in both images.
Compiling the Code
To compile your code, run the following from your lab_intro directory:
$ make
Running Your Code
If your code compiled with errors, an executable named lab_intro will be built. This executable starts by running the main function, which calls each of your image manipulation functions. Run it by running:
$ ./lab_intro
Check out out-illinify.png and see what your code did!
Testing Your Code
In CS 225, we use the widely-used C++ testing framework catch. Unit tests are provided for you in the tests folder and catch will run each of the unit tests for you. You are always encouraged to write additional test cases.
To make the test suite, run:
$ make test
After compiling the test suite, run the tests using:
$ ./test
For more information on running tests with Catch and interpreting the results, see Testing with Catch.
Submitting Your Work
You must submit your work to git for grading. We will use the following files for grading:
cs225/HSLAPixel.cppcs225/HSLAPixel.hlab_intro.cpp
All other flies will be ignored in grading.