On Your Own Machine
by Tamara Nelson-Fromm, Jenny Chen, Justin Hu, Brad Solomon, G Carl EvansThis guide will help you get started setting up an environment on your personal computer for completing the labs and MPs. We will only support working locally with Docker, but we may list other options for students who can support themselves.
For those who are unfamiliar with these terms, here is a short explanation of what each method means and the pros and cons of each.
- Working locally with Docker: you download a disk image and software required to create a standardized coding environment. You will still be able to access and use the files stored on your own machine.
- Pros: Supported by CS 225 Staff. You don’t need to worry about installing any development tools (e.g. valgrind, gdb) on your operating system. You also will not need to worry about your code behaving differently when we grade it.
- Cons: You will have to download and install some commercial software.
- Working natively: you download code and tools onto your own machine before working. You run commands on your own machine’s environment during development.
- Pros: Code running natively will have fewer overheads, and have full access to your system’s resources. The process of setting up text editor and working environment prepares your machine for future coding projects.
- Cons: Since your machine is very likely different from our testing environment, you will need to test your code separately to ensure you get the same results as our grading runs.
Disclaimer: Our grading runs are done using a Docker VM, and we expect you to test your code thoroughly on the Docker VM to ensure compatibility. You will be responsible for any issues arising from insufficient testing; no regrades will be given.
Working with Docker
1) Installing Docker
Docker is a lightweight container engine used to emulate OS-level virtual environments. For this class, it will serve as an all-in-one tool for your development environment.
- Docker Desktop (Recommended for Windows/Mac/Linux)
You can install Docker using Docker Desktop. Be sure to run Docker Desktop once installed, as it has some ‘first-time setup’ in order to actually install Docker on your system.
Warning: There is a separate installer between Intel and M1 Macs!
Note: Docker Desktop is commercial software, and while it is possible to use Docker without it, we will not provide support if you choose to use an alternative.
2) Installing VS Code
If you have not already installed VS Code, you are encouraged to download the software at the following link: VS Code
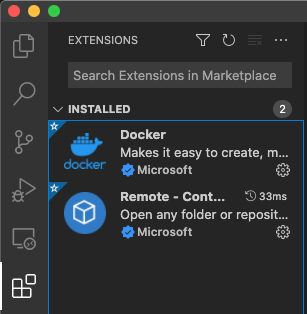
Once it is installed, install the Remote - Containers extension by either searching in the Extensions tab or using the following link: Remote - Containers
You can access the Extensions tab by clicking on the ‘Extensions’ icon in the navigation bar. While you are free to add other extensions based on your own preferences, make sure you have Remote - Containers installed before continuing.
3) Adding the course Dockerfile
The Dockerfile is used to describe a standard environment for software to run in. The Docker software will use this file to create a container with the described environment. For this course, our Dockerfile will provide you with an Ubuntu-based environment that has the necessary software and debugging tools for C++ preinstalled.
Create a new directory for your CS225 course work (e.g. ‘cs225’, though it can be named anything).
Inside the directory, create a new file named Dockerfile (with no file extensions), and copy the contents below into the file. Make sure to save!
FROM gcevans/cs225-container:fa22
ENTRYPOINT bash
Tip: Docker containers runs code on your computer. As with installing any other software, it is a good idea to make sure that it comes from a trusted source. Although it is not required for this course, the underlying Dockerfile for this environment will always be publicly available for you to review in this repository.
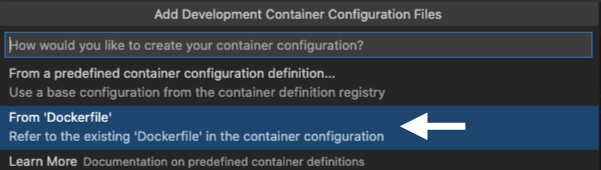
4) Building your environment
Using the Remote - Container extension on VSCode, run the command Remote-Container: Open Folder in Container. You can do this by either clicking on the bottom left-hand corner widget (the green X-shaped button) or by pressing F1 and typing in the command.

Open the folder you created previously, and make sure you select the ‘From ‘Dockerfile’ option in the popup.
Note: If this option does not appear, make sure that you selected the right directory, and the Dockerfile is saved.
The initial process can take some time as your computer downloads the required files and builds your environment. With a good computer and internet connection, this should not take longer than 5-10 minutes.
If done correctly, you should see a .devcontainer folder in your directory. You should now be able to edit your local files inside VS Code and use the VS Code terminal to run them in your new environment.
The environment should automatically close when you close the folder within VS Code, or when you quit VS Code. You can then always reopen it by running the Remote-Container: Open Folder in Container command again.
Working with WSL (unsupported, Windows-only)
1) Installing WSL2
Windows Subsystem for Linux, or WSL, is a compatibility layer that allows Linux to run natively within Windows. To install WSL, follow the instructions below.
- Open Command Prompt, PowerShell, or Terminal as administrator.
- Within the prompt, type
wsl --install.
After the command finishes, you should have a working WSL2 install on your computer.
2) Installing VS Code
If you have not already installed VS Code, you are encouraged to download the software at the following link: VS Code
Once it is installed, install the Remote - WSL extension by either searching in the Extensions tab or using the following link: Remote - WSL
You can access the Extensions tab by clicking on the ‘Extensions’ icon in the navigation bar. While you are free to add other extensions based on your own preferences, make sure you have Remote - WSL installed before continuing.
3) Installing the CS225 Container
Similar to the Dockerfile used for Docker, we provide a WSL2 image that contains a similar environment to the one we use for grading. To install the environment, follow the instructions below.
- Download the CS225 Container WSL image.
- Create a folder to store your WSL filesystem.
- This can be in any folder of your choice, such as
C:\Users\your-username\wsl\cs225\orC:\wsl\cs225\. - Warning: Do not delete this folder unless you intend on unregistering (uninstalling) the CS225 container. It contains the files required to run the container, as well as your course work.
- This can be in any folder of your choice, such as
- Open Command Prompt, PowerShell, or Terminal.
- Within the prompt, type
wsl --import cs225-container path-to-your-wsl-folder/ path-to-wsl-image.tar.
After the command finishes, you should have the CS225 Container on your computer.
4) Using your environment
Using the Remote - WSL extension on VSCode, run the command Remote-WSL: New WSL Window using Distro.... You can do this by either clicking on the bottom left-hand corner widget (the green X-shaped button) or by pressing F1 and typing in the command.
Select the cs225-container distro in the popup.
Your Windows directories will be mounted in /mnt/<drive-letter>/. For example, C:\Users\user\Desktop\cs225\ will become /mnt/c/Users/user/Desktop/cs225/.
You can choose to set up your course work directory either in a mounted directory (e.g., /mnt/c/Users/user/Desktop/cs225/), or natively within WSL (e.g., /home/user/cs225/). The latter will only be accessible within the WSL environment.
To close the environment, you can run wsl --shutdown within Command Prompt, PowerShell, or Terminal. You can then always reopen it by running the Remote-WSL: New WSL Window using Distro... command again.