Assignment Description
Alice has started to work on linked lists, but thinks Linked Lists are boring. Alice wants to learn a cool new data structure that’s a lot faster than a basic linked list. Alice was looking around the web and found a cool-sounding data structure called a Skip List. As an added bonus, it is even built using Linked Lists, something that Alice already knows. So, Alice starts to code it up. Before long, Alice is ready to test her code for the first time. So she starts up her program and sees:
Segmentation fault
Alice has a few options to debug her code. She could open it up and see if she
can spot the errors, but that’s really difficult to do, especially with
segmentation faults. She could try inserting cout statements, but that
requires adding and removing lots of lines of code for each bug. She could try
using ASAN or Valgrind, but that’s most helpful with memory errors and doesn’t
give much information about logical bugs. Her last option is you! She’s called
on your excellent debugging skills for help, and she’s asked you to use a new
debugger that she’s heard of: GDB.
Getting Started with GDB
To launch your program using gdb, run the following command:
gdb [program name]
To run your program with optional command line arguments:
(gdb) run [arguments]
Alternatively, you can do this in one line with the following command:
gdb --args ./program_name [optional] [args] [here]
This allows you to simply type
(gdb) run
to start your program.
Throughout the lab, we’ll use the notation
(gdb) command...
to indicate that the command should be run from within GDB.
GDB will provide several helpful features. First, it will output similar debugging information as Valgrind upon errors such as segmentation faults. Second, and more important, it allows you to stop the program execution, move around, and view the state of the running program at any point in time.
To do that, we will use the following common commands (see more details in the slides). We’ll also define the abbreviations of these commands, so you don’t have to type the full names of these commands when you want to use them.
Walking through your code.
break [file:line number]- Example usage:
break skipList.cpp:40 - Create a breakpoint at the specified line. This will stop the
program’s execution when it is being ran. (See
run). - When your program is stopped (by a previous use of
break) in a certain file,break nwill create a breakpoint at linenin that same file. - Note: There are other variations on how to use
breakhere. One variation is breaking at a function belonging to a class. Example:break SkipList::insert. - Abbreviation:
b. Example usage:b skipList.cpp:40
- Example usage:
clear [file:line number]- Removes a breakpoint designated by
break.
- Removes a breakpoint designated by
run (arguments)- Runs the program, starting from the main function.
- Abbreviation:
r.
list- Shows the next few lines where the program is stopped.
layout src- Shows an updating window with your source code and the current line of execution.
- Usually easier than type
listevery line or referring back to your open code
next- Continues to the next line executed. This does not enter any
functions. (See
stepfor this). - Abbreviation:
n.
- Continues to the next line executed. This does not enter any
functions. (See
step- Continues to the next line executed. Unlike
next, this will step into any proceeding functions - Abbreviation:
s.
- Continues to the next line executed. Unlike
finish- Steps out of a function.
- Abbreviation:
fin.
continue- Continues the execution of the program
after it’s already started to run. continueis usually used after you hit a breakpoint. - Abbreviation:
c.
- Continues the execution of the program
Viewing the state of your code.
info args- Shows the current arguments to the function.
- If you are stopped within a class’s function, the
thisvariable will appear.
info locals- Shows the local variables in the current function.
print [variable]- Prints the value of a variable or expression.
Example:
print foo(5) - The functionality of
printis usually superseded byinfo localsif you are looking to print local variables. But if you want to view object member variables,printis the way to go. - Example:
print list->head. Orprint *integer_ptr. - Abbreviation:
p.
- Prints the value of a variable or expression.
Example:
Other useful commands.
Checking Out the Code
To check out your files for this lab, use the following command:
svn up
For the list of files and their descriptions, see Doxygen for this lab. Doxygen is a nice way to view the documentation for the lab.
Skip Lists: Intro
For this lab, we have provided a doubly linked Skip List for you to debug. Skip lists are ordered (sorted) data structures composed of layers of linked lists. Each layer is a normal linked list with only a subset of the nodes. Every node is guaranteed to appear on the first layer, and on each level above that, the probability it appears is \(p^{\textrm{level}}\) (which you will choose ). If the probability is too low, we end up with a linked list, and if it’s too high, a stack of linked lists with height layers. The ideal probability for a skip list is \(p=\frac{1}{2}\). In our lab, that would be a probability of 50.
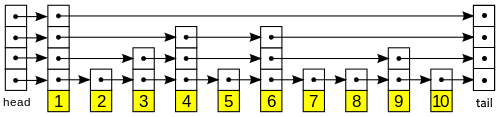
Here is an illustration of a skip list (note that this drawing is only singly linked).
Since not all nodes appear on each level, we see on average faster search, insertion , and removal times by effectively “skipping” some nodes. Once you have successfully fixed this implementation of a Skip List, you will be able play around with different probabilities and node counts. If you choose a probability of 50, you can see how a “good” list looks, whereas higher or lower probabilities will illustrate degenerate cases. A note, this Skip List is not ideal, a singly linked list would function faster. We have modified it to allow for the chance to introduce new bugs and help you practice for the upcoming MP3.
We have also designed this skip list so that it uses sentinel nodes. That is, head and tail will always be pointing at nodes, and these nodes are not logically considered part of the data.
Due to our use of sentinel nodes, there should be no NULL pointers anywhere in our list, except for all of head’s previous pointers and all of tail’s next pointers.
The purpose of this lab is to teach you to use and understand GDB. As such, you will be using GDB in a data structure that you are not intimately familiar with. The purpose is not necessarily to learn about skip lists. As such, the bugs you will be fixing will be logic flow type errors, not algorithmic bugs. We will explain the basics of the algorithms below.
Skip Lists: Search (Find)
To find in a Skip List, we need a key to search for. The general algorithm is as follows: start at the highest level of head. Look at the next key. If that key is before your key you want to find, go forward. Otherwise, if you’ve found the key, return that value. Else, you need to go down. Repeat. Let’s illustrate with an example:
Suppose we want to search for the value associated with key 5. The first step is to start at head’s highest level. We look ahead and see that it’s pointing at 1. 1 < 5, so we advance forwards. 1’s next is pointing at tail (whose key is also larger than 5), so we descend. The next pointer at this level is pointing at 4. 4 < 5, so we advance. 4’s next pointer points at 6, and 5 < 6, so we descend. Again, 4’s next is pointing at 6 so we descend. Now, 4’s next at this level points at 5. Since 5 == 5, we return the value stored with key 5.
If the key did not exist, we would return the default value when the next key was larger than the search key and we were on the lowest level.
The search() function needs to return a default value on failure. Because we are returning RGBAPixels, an arbitrary decision needs to be made for what to return in case of failure. For the purposes of this lab, we will return a pixel with value (0, 0, 0, 50) when the key is not found in the list.
Skip Lists: Insert
To insert into a Skip List, we need a key and a value. For this lab, keys will be integers and values will be RGBAPixels (this could be templatized, but that’s not the focus of the lab). Because Skip Lists are sorted, we need to first find where we should be inserted. To do so, we start from the top of the list and scan forward. If the key we see is before the key we are inserting, we will go forward. If the key is after our key, we would go down a level and repeat. Once we find where we should be inserted, we will calculate a random height based on the probability defined when the program was run, and insert ourselves there. If our height is larger than the list’s current height, we are going to grow our sentinel nodes. Then, we simply loop over each pair of next/prev pointers in the new node and set it to the nodes after and before it.
Let’s consider an example using this diagram:
Suppose we want to insert a node with key 5.5 (assume keys are floats for this example). We begin at head’s top level. We see that the key of the next node is 1. 5.5 > 1 so we move forward. We see then that the next pointer is tail (whose key is also > 5.5), so we therefore go down. We see that the next key is 4. 4 < 5.5, so we move forward. The next node is 6, and 6 > 5.5, so we go down. We see that the next key is still 6, and 6 is still more than 5.5, so we go down again. We see that the next key is 5. 5 < 5.5, so we go forward. We look at the next key and see that it’s 6. 6 > 5.5. Because we are already at the lowest level, we’ve found out where to insert. So, we create a new node of random height. Let’s suppose first that that height was 2. So, we would not need to increase the height of the list. We would set both next pointers to 6, and the first (lowest) prev pointer to 5, and the second prev pointer to 4. At this point we are done. However, let’s also illustrate what would happen if we needed to expand the list. Let’s assume that the height of the new node was actually 6. We would need to expand our list’s height by 2, and we would set those next pointers of head to the new node, and the prev pointers of the tail node to the new node. We would then loop up the new node, setting the first three next pointers to 6, and the next three to tail. The first prev pointer would point at 5, the next two would point at 4, and the last three would point at head. After setting these pointers, we are done with the insertion.
For this lab, we choose to say that attempting to insert a duplicate key will update the existing value instead of inserting again. This means that a traversal should never show the same keys twice!
Skip Lists: Remove
Once we have find(), remove is not a long algorithm. First, we will run a search for the node with the given key. If it doesn’t exist, we stop. Otherwise, we will loop through all of the next and previous pointers and assign the prev’s next to our next, and our next’s prev to our prev. Let’s walk through an example:
Suppose we want to remove 4. First, we search for 4 and get a pointer to it. Then, we loop up its pairs of pointers. That is, first we’ll set 5’s prev pointer to 3, 3’s first next pointer to 5. Then we’ll set 6’s second prev pointer to 3, and 3’s second next pointer to 6. Then, we’re going to set 6’s last prev pointer to 1, and 1’s third next pointer to 6. Finally, we free the memory for 4 and finish.
GDB: First Tasks
These tasks exist to help you learn how to navigate through code execution with GDB. We are going to walk through two of them, although there are more examples to play around with.
These code files are located in the gdb-examples/ folder, but the executables
will be generated in the main directory.
These examples will not be graded, but will prepare you for the task ahead of debugging Alice’s code!
Print/Display
One of the most useful aspects of GDB is the ability to view variable values. In order to do that, you must stop code execution; here, we will use a breakpoint. The goal of this exercise is to find out why our swap program doesn’t work.
Compile the code using make.
make -jStart gdb with the executable.
gdb ./swapInsert a breakpoint in the file. We’ll put it at main so we can step through from the beginning.
(gdb) break mainSetup our source code view.
(gdb) layout srcRun the program. This program takes two arguments.
(gdb) run 5 7Display both the value of
aand the value ofb. Until you get to where they are initialized, they will have garbage values.(gdb) display a (gdb) display bStep through the code until you get to line 20. Notice how a and b have their correct values now
(gdb) nextFigure out why this swap program doesn’t work and fix it!
Backtrace
One of the most useful commands in GDB is backtrace. This shows you the
function stack at the current execution time. We will use this to find out why
our recurse program segfaults.
Compile the code using make:
make -jStart gdb with the program.
gdb ./recurseRun the program. This program takes one argument
(gdb) run 4Your program should be printing several *’s to the screen. Press Ctrl+C to halt the program. This is the as if the program had hit one of your breakpoints
(gdb) <Ctrl+C>Use
backtraceto print your program’s function stack(gdb) backtraceYou’ll see a different output depending on when you hit Ctrl+C. However, you may see some library functions at the top and several recursive iterations of the function
recurse. You can see that the length parameter is unchanged, and index keeps increasing. To debug this, we will step through our program line by line. First, type q then enter to exit the stack trace. Then set a breakpoint on main.(gdb) b main (gdb) layout src (gdb) r 4Step through your program until you hit line 35
(gdb) nextNow, we want to enter the function. In gdb, we do that by using the step command.
nextwill go to the next line of the current function (skipping over function calls), whilestepwill also enter functions.(gdb) stepNow, use
nextandstepappropriately to find out why the program never stops.
Debugging Alice’s Code:
Before you start working on debugging, you should familiarize yourself with the code. Look in skipList.h and skipNode.h to see what you have to work with. Knowing which functions and objects you have will make debugging much smoother and more satisfying.
You’re only going to need to fix bugs in skipList.cpp, but not all the functions in the file are broken. You’re going to need to figure out which functions are broken and how to fix them using the debugging techniques you’ve learned already combined with gdb.
Alice’s First Bug
As you can see, Alice’s code does not work! The first error is semantic, we are segfaulting on what looks like perfectly valid code for a list with sentinels.
Compile the code using make:
make -jStart gdb with the executable.
gdb --args ./lab_gdb2 4 50Run the program
(gdb) runPrint some values
(gdb) p head
$1 = (SkipNode *) 0x0

(gdb) p tail
$2 = (SkipNode *) 0x0
You should see something like the above. For some reason, our head and tail are NULL! But with sentinel nodes, that shouldn’t be possible! We need to look around for where the sentinel nodes are being initialized, and figure out why they aren’t working.
After taking a look through
skipList.cpp, you should notice that the constructor sets up these values. So let’s set a break point, and rerun our program:Add the breakpoint
(gdb) b skipList.cpp:21Rerun the program
(gdb) runIt will ask you if you want to restart the program from the beginning – choose yes, then press enter.
You should now see something like the following:
Breakpoint 1, SkipList::SkipList (this=0x688010) at skipList.cpp:21
21          SkipNode* head = new SkipNode();
Now, we need to step through and see what’s going on. The
nextcommand will be helpful here! Make sure to print values after every step to see where the problem is happening. Once you’ve fixed this constructor, move on to the next section to solve the second bug.
Alice’s Second Bug
As you can see, Alice’s code still does not work! The second error is logical, the
findRHelper function does not seem to work properly.
Compile the code using make:
make -jStart gdb with the executable.
gdb --args ./lab_gdb2 4 50Run the program
(gdb) runUse
backtraceto print your program’s function stack(gdb) backtrace
You should see something like the following before running backtrace:
Program received signal SIGSEGV, Segmentation fault.
0x000000000040ce28 in SkipList::findRHelper (
    this=<error reading variable: Cannot access memory at address 0x7fffff7feff0>,
    key=<error reading variable: Cannot access memory at address 0x7fffff7fefec>,
    level=<error reading variable: Cannot access memory at address 0x7fffff7fefe8>,
    curr=<error reading variable: Cannot access memory at address 0x7fffff7fefe0>)
    at skipList.cpp:205
205     {
and the following after:
#0  0x000000000040ce28 in SkipList::findRHelper (
    this=<error reading variable: Cannot access memory at address 0x7fffff7feff0>,
    key=<error reading variable: Cannot access memory at address 0x7fffff7fefec>,
    level=<error reading variable: Cannot access memory at address 0x7fffff7fefe8>,
    curr=<error reading variable: Cannot access memory at address 0x7fffff7fefe0>)
    at skipList.cpp:205
#1  0x000000000040cef8 in SkipList::findRHelper (this=0x673010, key=0, level=0,
    curr=0x673040) at skipList.cpp:217
#2  0x000000000040cef8 in SkipList::findRHelper (this=0x673010, key=0, level=0,
    curr=0x673040) at skipList.cpp:217
#3  0x000000000040cef8 in SkipList::findRHelper (this=0x673010, key=0, level=0,
    curr=0x673040) at skipList.cpp:217
#4  0x000000000040cef8 in SkipList::findRHelper (this=0x673010, key=0, level=0,
    curr=0x673040) at skipList.cpp:217
#5  0x000000000040cef8 in SkipList::findRHelper (this=0x673010, key=0, level=0,
    curr=0x673040) at skipList.cpp:217
#6  0x000000000040cef8 in SkipList::findRHelper (this=0x673010, key=0, level=0,
    curr=0x673040) at skipList.cpp:217
#7  0x000000000040cef8 in SkipList::findRHelper (this=0x673010, key=0, level=0,
--[snip]--

---Type <return> to continue, or q <return> to quit---
Your output may differ slightly, for example in the key or exact memory addresses. Because the find() function has some randomness involved, this is to be expected.
If you press enter for a while, you will see that we have over 20000 recursive calls! This, along with our first piece of information that we can’t read our parameters (because we don’t own the memory) and the fact that the parameters aren’t changing in any of the calls indicate that we are dealing with a stack overflow - we’ve called so many function that we run out of stack memory and crash. The cause of these is usually having infinite recursion, although some large problems may also stack overflow if attempted to be solved recursively (this won’t be an issue in this lab).
Where to go from here
Once you’ve fixed the first two bugs, you’ll see that your program is still not working :(. As you fix bugs, you may approach the point where it appears to work correctly. However, this does not mean that Alice’s skip list is working! Try adding some test cases to main and see what happens!
Some useful test cases would be:
- Try to remove something
- Try to add duplicates
- Try to search for things
- Try increasing the scale (by increasing the image size for example)
- Try changing the probability and make sure your code works if many nodes are at the max height, or many nodes are not high at all
- Testing out all the public methods
- Making sure the constructors all work correctly
- Making sure implementation-specific features such as default return values work correctly
We’ve left a TODO comment in main.cpp which is a good place to start writing some of these test cases. Failing Catch tests will also suggest good test cases to add to main() for you to step through in gdb.
While GDB is great, there are some aspects of it that aren’t fun to work with. For example, when using STL containers (such as the vectors in this assignment), gdb won’t be able to access them or their functions, giving an error instead.
For this reason, if you want to see what’s inside myVector[5], you need to save it into a local variable in your source code! To alleviate this annoyance, we’ve provided some functions that will return the contents of the vector at a position, as well as print a whole node and it’s surrounding keys.
They are:
gdbGetPointer(SkipNode*, size_t)- returns the node’s i-th pair of pointers. Example usage:(gdb) print gdbGetPointer(traverse, 3).next->keygdbGetNode(SkipNode*)- Will get a string representing the node’s neighbors. This isn’t super useful in gdb because it will print the std::string strangelygdbPrintNode(SkipNode*)- Will print out the string returned by gdbGetNode(). NOTE: This one won’t work (well) if you are usinglayout src. You’re going to have to not use the TUI to use this one well (the TUI covers it up). Example usage:(gdb) call gdbPrintNode(traverse)
You can also call the functions mentioned below in “Checking Your Output” to help you debug.
This section is very important! Once your executable runs without segfaulting or infinite looping, you should test it in Catch. You will almost certainly fail some test cases. Once you see which functions appear to be breaking, add some test cases to main which call those functions. This will allow you to see if they segfault and also step through them in gdb.
Don’t just change random lines! Use gdb to pinpoint in which specific line(s) they may occur and reason about why. You don’t want to introduce new bugs into the code!
Checking Your Output
Once you think everything is working, you can run Catch with the provided tests:
make test && ./test
Note that the test cases won’t work well if your program is segfaulting or
infinite looping! Make sure that if your test cases aren’t working, you try to
isolate the test case that is failing to run and test it manually from main.cpp
You can also extend your main file to add more checks. These functions may be helpful:
printKeys()printKeysReverse()traverse()traverseReverse()
Once you think your code works, feel free to play around with the skip lists. The main function allows you to try different sizes of list, different probabilities, and even change the colors on the output images! The main function will generate two images:
- out-structure.png - Shows the structure of the skip list. You can see how changing the probability can radically alter the the structure and efficiency of the list, and try to apply your intuition as to why.
- out-degenerate.png - Shows how “degenerate” the list is. With a probability of 50%, you will have a list that’s very close to the “perfect” skip list. As you move away from a probability of 50%, you will see the list become more and more degenerate, which means that we are losing more and more of the advantages of a skip list and simply becoming a really fat and memory-inefficient linked list, or an overly-complicated linked list depending on which direction you go. You can see this measure of degenerate-ness by how many black pixels there are – the more black pixels, the more the list diverges from the “perfect” list, and the less black pixels the closer to being “perfect” the list is.
While it may help you debug to run the executable with small image_size
numbers, the images will not be very useful for such small lists. Try running
with at least an image_size of 16 for out-structure.png and a size of 64 for
out-degenerate.png to get the best results. Also note that for
out-structure.png, it will be img_size * img_size + 2 pixels wide, which will
quickly become unwieldy.
Here are some example images (all seeded with srand(225)):
out-structure for arguments img_size = 16 and probability = 50:

out-structure for arguments img_size = 16 and probability = 85:

out-degenerate for arguments img_size = 128 and probability = 50:

out-degenerate for arguments img_size = 128 and probability = 60:

The degenerate images are showing how far away from a perfect skip list you are.
Notice how this very quickly diverges as you distance yourself from probability
= 50. The structural images are actually showing the structure of your skip
list. Notice how as we increase the probability you get many more nodes capping
out at the maximum height of the skip list. If you want to see your own skip
list to see if the images match (it is not guaranteed even if you seed it the
same), just replace the srand(time(NULL)) in main.cpp with srand(225).
Committing Your Code
Commit your changes by using the following command:
svn commit -m "lab_gdb2 submission"
Grading Information
The following files are used in grading:
skipList.cpp
All other files including any testing files you have added will not be used for grading.
Additional Resources
- Quick guide to GDB: http://beej.us/guide/bggdb/.