Lab 3: myInstagram
Sep. 16 - Sep. 18
Introduction
In lecture this week, you learned about looping in JavaScript. You will apply the use of JavaScript by transforming an image by changing the color of every pixel. For example, the first filter you will build is:
Download, Extracting, and Opening the Lab
Download and Extract the Lab
To get started, first download the ZIP file for Lab 3 here. Extract the folder.
- If you are unsure how to do this, you can refer back to the instructions as part of Lab 2.
Opening the HTML in a Web Browser
Inside of the folder with the extracted file, open the myInstagram.html file using either Chrome or Firefox. (It may be necessary to right-click the file and choose "Open With".)
- If you see an orange bar span across the top of the screen, you extracted the file correctly! Awesome!
- If you only see a white background with no orange bar, you did not extract the file. Try carefully repeating the steps for extracting the lab.
Opening the JavaScript in a Text Editor
For this lab, you will be working it filters.js.
On a lab machine, Notepad++ is an ideal text editor for this class. To open Notepad++:
- Open the Start Menu on the lab computer
- Choose All Programs
- Choose Word Processing
- Choose Notepad++
Completing the Lab
SimpleImage API
Throughout this lab and your MP, you will be using variables that are of SimpleImage data type. These variables are not Numbers or Strings, but instead are images that can be manipulated through methods that you can call on the variable.
If you have a variable SIMPLEIMAGE of data type SimpleImage, you can use the
properties and methods from the following list.
SIMPLEIMAGE. You need to use either
origImg or newImg that are passed into your function!
-
SIMPLEIMAGE.width, contains the width of the image (a Number) -
SIMPLEIMAGE.height, contains the height of the image (a Number) -
var pixel = SIMPLEIMAGE.getRGB(x, y), returns the color of the pixel, in RGB, as the location (x,y). The returned object has three parameters:pixel.r, the red value of the pixel (a Number in the inclusive range 0-255)pixel.g, the green value of the pixel (a Number in the inclusive range 0-255)pixel.b, the blue value of the pixel (a Number in the inclusive range 0-255)
-
SIMPLEIMAGE.setRGB(x, y, pixel), sets the value of the pixel at location (x,y). Thepixelfunction parameter must be of the same type returned by thegetRGBfunction. -
var pixel = SIMPLEIMAGE.getHSL(x, y), returns the color of the pixel, in HSL, as the location (x,y). The returned object has three parameters:pixel.h, the hue of the pixel (a Number in the inclusive range 0-360)pixel.s, the saturation percentage of the pixel (a Number in the inclusive range 0-1)pixel.l, the luminosity percentage of the pixel (a Number in the inclusive range 0-1)
-
SIMPLEIMAGE.setHSL(x, y, pixel), sets the value of the pixel at location (x,y). Thepixelfunction parameter must be of the same type returned by thegetHSLfunction.
Part 0: Find an Image
Grab an image from your photos, the Internet, or anywhere to use as part of this lab. Save it to your desktop or somewhere you can easily access. This photo should not be black and white as we will be playing with the hues of colors, so black and white photos don't really work.
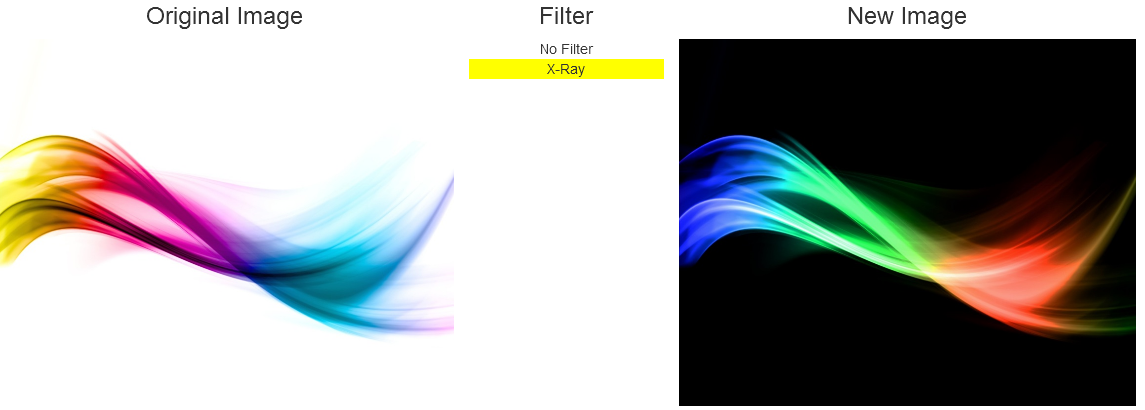
Part 1: Creating an X-Ray Filter
In fliters.js, an empty function called filter_xray has been defined for you.
To complete this function, you should create an X-Ray Filter. To do that, for every pixel:
-
Take the pixel's red value and invert it. Inverting it can be done by taking
pixel.r = 255 - pixel.r. - Take the pixel's green value and invert it.
- Take the pixel's blue value and invert it.
In order to do this, you need to loop through every pixel. Since an image is a width by a height, we need to go through every pixel by looping through the width and then, inside of the width loop, looping through the height.
-
Remember: the generic format of a for-loop is:
for (var i = 0; i < a.length; i++)
When following the below steps, refer to this generic for-loop and:- replace
iwithxory - replace
i < a.lengthwith the correct conditional for your image
- replace
-
How do you loop through the image by width?
-
Create a loop that start
x=0 -
Make the loop run until
xis less than the width of the original image- Use the information in the SimpleImage API box on the right figure out which property of image you use to get the width.
-
At each step, add one to
x
-
Create a loop that start
-
How do you loop through the image by width?
-
Copy the
widthfor-loop above -
Paste it inside the
widthfor-loop and:- change
xto bey - change
widthto beheight
- change
-
Copy the
-
Your final code for this problem will have the following structure:
// inside of function filter_xray {
//   for loop for x to move from 0 -> original image width {
//     for loop for y to move from 0 -> original image height {
//       get the value of the original image into pixel
//       change the value of the pixel
//       set the value of the pixel in the new image
//     }
//   }
// }
Test your code now!
At this point, make sure that you and your team members all have the receipt displaying the correct information for all the code you have completed to this point. Make sure you understand the code you have written so far. The next part will build on the understanding of this first part.Part 2: Illinify an Image (Extra Credit -- Worth +1, Graded Individually)
In this part, we will explore the pixels by their HSL color. To "Illinify" an image, we will convert the image to be only hues of blue and orange, leaving the shading, saturation, and luminosity of each pixel the same.
First, go to http://hslpicker.com/ and find a good value for the hue of an Illini colored orange and blue (the top-most slider). Make sure to write down the hue values for both orange and blue.
Next, come up with an algorithm:
- What all hue values do you want to convert to orange?
- What all hue values do you want to convert to blue?
- Hint: Maybe take the average of the orange and blue values, everything above/below that average is converted to the appropriate color?
Write a new function that implements that algorithm:
- Copy the
filter_xrayfunction and rename it tofilter_illinify. - Write the code the code to update the hue of the pixel based on the value of the pixel
- Remember: you will want to use the
getHSLandsetHSLfunctions instead of the RGB functions
Finally, add your new filter to the list of filters. Find the filters variable at the bottom of your filters.js
and copy and paste the line of code for the X-Ray filter. Update the fields to call your new filter (this includes updating both
the name value and the func value with the name of your new funciton.
Test your code now!
At this point, make sure that you and your team members all have the receipt displaying the correct information for all the code you have completed to this point. Make sure you understand the code you have written so far. The next part will build on the understanding of this first part.Part 3: Illinify an Image Even More! (Extra Credit -- Worth +1, Graded Individually)
While our second filter did a great job turning the images to shades of orange and blue, we want more orange and blue!
Copy the entirety of the function (make sure to rename the name of the variable that you are assigning the function as you cannot have the same variable twice) you used to complete Part 2 and add the following logic for every pixel:
- If the saturation of the pixel is greater than or equal to 0.5, make the saturation 1.0.
- If the saturation of the pixel is less than 0.5, add 0.5 to the saturation.
Just like Part 2, add your new filter to the filters variable at the bottom.
Submission
To submit your lab, you must submit your filters.js to the CS 105 website. You should submit ONLY .js file. You do not need to submit the other files in the folder. Click here to submit the lab!